It's three days before finals. Maya is a second-year biology student. Her course materials for BIO 201 alone include 12 weekly lecture PDFs (named inconsistently across the semester — some "Lecture1.pdf," some "BIO 201 - Week 6 - mitosis.pdf," some just "Untitled.pdf"), three textbook chapters her professor uploaded, six lab handouts, four research papers she downloaded for the term project, and a midterm study guide she meant to organize back in October. Most of it is in her Downloads folder. Some of it is on her laptop's desktop. A few files are still on the course portal she hasn't checked in two weeks.
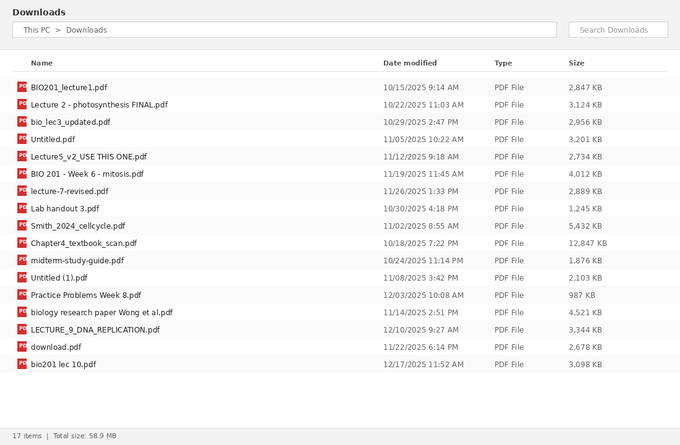
[Screenshot: messy-downloads-folder.png — a Downloads folder showing 17 messily-named PDFs from a single biology course.]
This is the situation I see almost every semester when students message us asking how to "study smarter" with PDFs. The problem is rarely that students don't know how to study — it's that they're spending 20 minutes finding the right file every time they want to start. By the time they actually open the document they need, their focus is already broken.
In five-plus years of working with document automation and watching how students actually use PDF tools, I've found that the entire problem usually comes down to three operations: combining scattered files, extracting only the parts you need from huge documents, and converting key materials into something you can annotate. This guide walks through that exact workflow using Maya's biology finals as the example, then briefly covers how to adapt it for different types of students.
Why This Gets Out of Hand
By midterms, the average undergraduate has 80–120 PDF files across 4–5 courses. By finals, that number doubles. Lecture slides, lab handouts, supplementary readings, research papers, study guides, practice exams, professor's notes — all distributed as PDFs because PDFs preserve formatting across devices. The format choice makes sense for instructors. But for students, the result is file accumulation without organization, and study materials scattered across folders, devices, and platforms.
The fix isn't more storage or a better folder structure — it's reducing the number of files you actually have to manage. That's what the three operations below accomplish: merge collapses many files into one, split pulls out only what you need, and convert turns rigid PDFs into editable notes.
Method 1: Merge All Lecture Slides Into One Searchable Study Guide
Here's the most impactful single operation for exam prep: take every lecture PDF from a course and combine them into a single, searchable, bookmarked study guide.
Why this matters: when you're reviewing for finals, you don't want to open 12 separate files. You want to open one file, scroll through the entire semester's content, search for "mitosis" and find every mention across all 12 lectures, and jump between weeks using bookmarks instead of digging through folders.
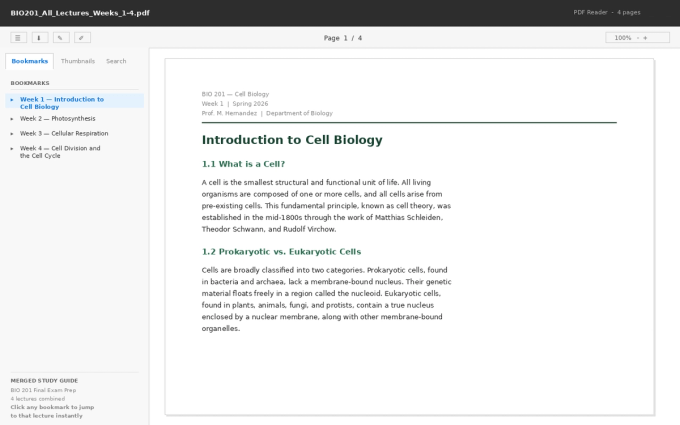
[Screenshot: merged-pdf-with-bookmarks-mockup.png — a PDF reader showing the merged study guide with the bookmarks panel on the left listing Week 1, Week 2, Week 3, Week 4 lectures, and the document content on the right.]
The merged file in the screenshot above is the result for Maya: 12 weekly lectures combined into one PDF with a clickable table of contents (bookmarks) showing each week. Click "Week 6 — Mitosis" in the bookmarks panel and the document jumps directly to that lecture. Search for "ATP" and every result appears across the entire semester at once.
How to merge lectures with PDF Doctor
- Open the Merge PDF tool on PDF Doctor.
- Upload all your lecture files. The order matters — drag them into chronological order (Week 1 first, Week 12 last) before merging. If your files are inconsistently named, sort them by date modified before uploading.
- Click Merge. Download the combined PDF.
- Rename it something searchable: BIO201_All_Lectures_Weeks_1-12.pdf is more useful than merged.pdf.
The whole process takes about two minutes. The result is one file you can carry through the entire study session.
A note on bookmarks
Browser-based merge tools don't always add bookmarks automatically. If your merged file just looks like a long PDF without a navigation panel, you have two options: add bookmarks manually in Adobe Acrobat (free reader version doesn't allow this — you need Acrobat Pro), or use a desktop tool like PDFsam (free, open-source) that handles bookmarks during the merge. For most students, the searchable text alone is enough — you can use Ctrl+F to find anything across the merged file, which is the main benefit anyway.
Method 2: Split Large Textbooks to Extract Only What You Need
The other half of the problem: some of your study materials are too big, not too scattered. A 600-page textbook PDF, a 47-page research paper, a 200-page course pack — you need 20 pages from it, and those 20 pages are buried somewhere in the middle.
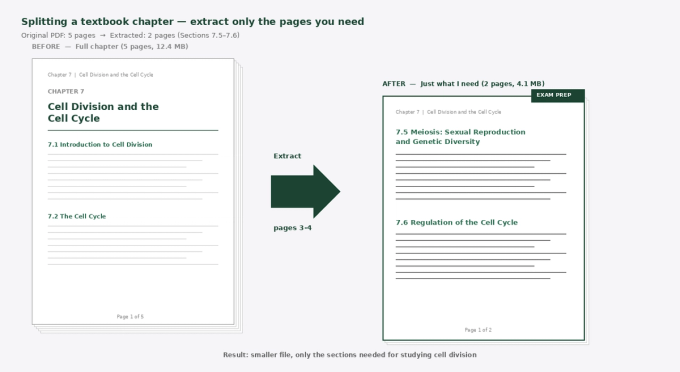
[Screenshot: textbook-split-mockup.png — a side-by-side comparison showing a 5-page textbook chapter on the left and the 2-page extracted version on the right, with an arrow indicating the "extract pages 3-4" operation.]
In the example above, Maya's textbook chapter on cell division is 5 pages, but only sections 7.5 and 7.6 (pages 3–4) are on the exam. Splitting those out gives her a focused 2-page document she can review without scrolling past content she doesn't need to know.
For a real textbook chapter that might be 40 or 50 pages with only one section on the exam, this is the difference between a manageable study session and a frustrating one.
How to split a textbook chapter with PDF Doctor
- Open the Split PDF tool on PDF Doctor.
- Upload your large PDF.
- Specify the page range you want to extract (e.g., "12-18" for pages 12 through 18). If you want multiple separate sections, you can split into multiple smaller files.
- Download the extracted file. Rename it descriptively: Ch07_CellDivision_pages_12-18.pdf instead of split.pdf.
A practical tip from talking to students who use this regularly: figure out which pages you actually need before you split. Open the original PDF, find the section, note the page numbers, then split. Trying to figure out what to extract while you're inside the split tool wastes time. Some students keep a quick list — "for the BIO 201 final, I need ch4 pages 15-22, ch7 pages 8-14, ch9 pages 1-9" — and split them all in one session.
A privacy note on textbook PDFs
If your textbook is from a paid course materials platform or a copyrighted source, be thoughtful about uploading it to a browser-based tool. Most browser tools (including ours) automatically delete files after processing, but if you're working with restricted course materials your university requires you not to share, a desktop tool like PDFsam or a built-in PDF reader's split function keeps everything on your machine. For lecture notes your professor distributed and study materials you created yourself, browser tools are fine — there's no copyright concern with your own files.
Method 3: Convert PDFs to Word for Real Annotation
The third operation is the one most students underuse, and it's often the most valuable for actually learning the material: converting a PDF to Word so you can mark it up the way you would a printed page.
PDFs are designed for viewing and printing, not editing. You can't easily highlight in different colors, write substantial notes in the margins, simplify dense paragraphs in your own words, or pull together a personal summary at the top of the document. All of that becomes natural in Word.
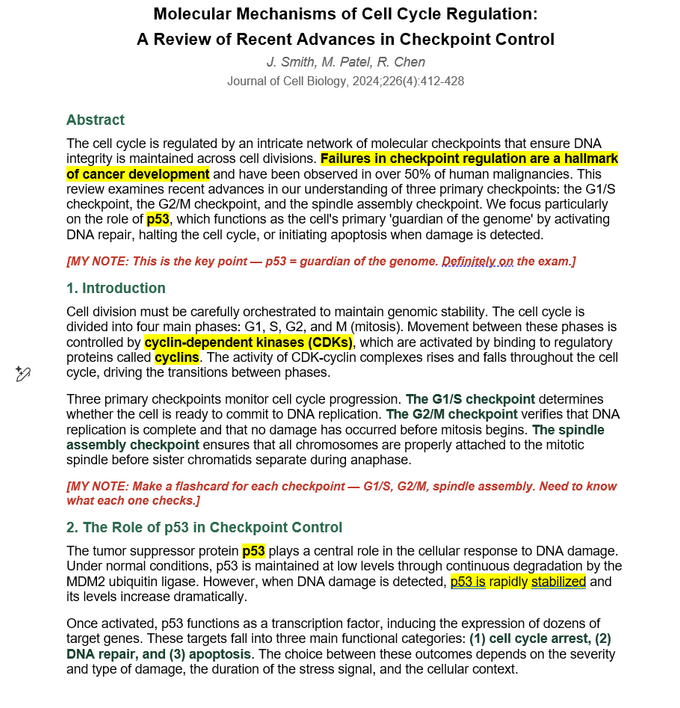
[Screenshot: research-paper-annotated.png — a converted research paper open in Word, with yellow highlighted key terms (p53, cyclin-dependent kinases), red inline annotations marked "[MY NOTE: ...]", a yellow summary box at the top with study takeaways, and a blue summary box at the bottom listing key points to remember for the exam.]
The annotated document above is what real student study notes look like after a PDF-to-Word conversion. Maya took a research paper from her term project, converted it, then added: a study notes box at the top with the main takeaway and which pages matter for the exam, yellow highlights on the most important terms (p53, cyclin-dependent kinases, the three checkpoints), inline red annotations explaining what to memorize and what to skip, and a blue summary box at the bottom listing the five things she actually needs to remember. None of that is possible in the original PDF.
The most powerful thing about this approach: you're not just reading the paper, you're actively engaging with it. Writing your own notes inline forces you to translate the academic language into something you understand, which is the actual mechanism of learning.
How to convert a PDF to Word with PDF Doctor
- Open the PDF to Word tool on PDF Doctor.
- Upload your PDF (research paper, lecture notes, lab handout, whatever you want to annotate).
- Click Convert. Download the .docx file.
- Open in Word, Google Docs, or LibreOffice and start annotating.
One important caveat
PDF-to-Word conversion works well for digitally created PDFs (lecture slides, research papers, textbook chapters from publishers). It works poorly for scanned documents — old textbooks scanned to PDF, professor's handwritten notes that were photographed, course handouts that started as paper. For scanned content, you need OCR (Optical Character Recognition) before conversion will produce useful results. Adobe Acrobat and ABBYY FineReader handle OCR plus conversion in one step. The free open-source option is OCRmyPDF.
Maya's Complete Finals Workflow (Three Days, Four Courses)
Here's how all three operations fit together in a real exam-prep session.
Day 1 (Sunday) — gather and organize. Maya creates a folder called BIO 201 - Final Exam Prep with four subfolders: 01_Lectures_Merged, 02_Textbook_Chapters, 03_Research_Papers, 04_My_Study_Notes. She downloads everything from the course portal, drags it into the right folder, and renames each file with a clear description (no more Untitled.pdf).
Day 1 (Sunday) — merge lectures. All 12 weekly lecture PDFs go into the merge tool in chronological order. Result: one file called BIO201_All_Lectures_Weeks_1-12.pdf saved in the 01_Lectures_Merged folder. Twenty minutes total.
Day 2 (Monday) — split textbook chapters. Maya checks the syllabus to identify which chapters and pages are on the final. Three chapters, specific page ranges from each. She uses the split tool to extract just those sections, saves them in 02_Textbook_Chapters with names like Ch07_CellDivision_pages_8-14.pdf. Forty-five minutes total.
Day 2 (Monday) — convert key research papers. Two of her four research papers are particularly important. She converts both to Word and adds her annotations: highlights, inline notes, summary boxes. Saves the annotated versions in 03_Research_Papers. Two hours total (most of which is actually reading and annotating, not converting).
Day 3 (Tuesday) — write the master study guide. With everything organized and annotated, Maya creates a single Word document called Final_Exam_Master_Study_Guide.docx in her 04_My_Study_Notes folder. She pulls key concepts from the merged lectures, the extracted textbook chapters, and her annotated research papers into one coherent document organized by exam topic. This is the document she actually studies from.
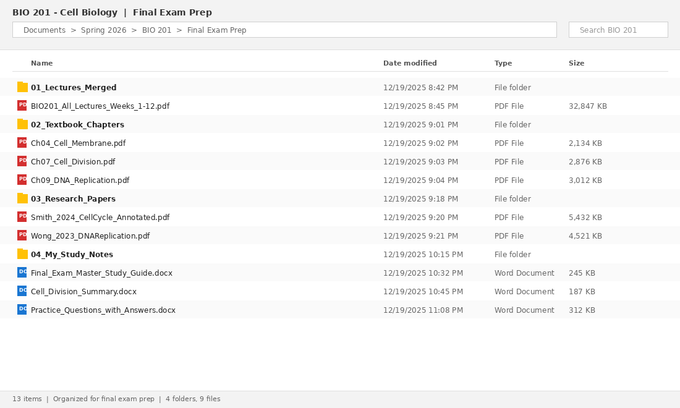
[Screenshot: clean-folder-structure.png — the organized folder hierarchy at the end of the workflow, showing the four subfolders with the merged lecture file, three textbook chapter extracts, two annotated research papers, and three study guide Word documents.]
The "after" state above is the result of about 4–5 hours of organization work spread over two days. In exchange, Maya now has a single study system she'll use for the next three days of intensive review — instead of fighting her files for the entire week.
Common Student Mistakes (And How to Avoid Them)
These are the specific things I've seen students do that turn the workflow against them.
Merging files in the wrong order before submitting an assignment. A student combines several scanned pages of a handwritten lab report and uploads it to the assignment portal — but the pages are in reverse order because the merge tool processed them by upload time instead of filename order. The professor reads page 8 first and page 1 last. Fix: always sort files into the correct order before merging, and always open the merged result and verify the page sequence before submitting.
Splitting a textbook page range that excludes a critical figure. Students sometimes extract pages 14–18 of a chapter and miss the diagram on page 13 that explains the entire concept. Figures and key diagrams often live on the page just before or just after a section's main text. Fix: open the original PDF first, identify the figures you need, then expand your page range to include them.
Converting a scanned PDF to Word and getting garbage. A student converts an old scanned textbook chapter to Word expecting editable text, and gets a Word document full of misread characters, broken paragraphs, and missing words. The PDF was an image-based scan, not digital text. Fix: check whether you can highlight and select text in the original PDF before converting. If you can't, the PDF needs OCR first — and even then, expect to do cleanup.
Using one giant merged file for everything. Some students merge every PDF from every course into a single 800-page file thinking it's "more organized." It's actually less usable — searches return too many results from too many subjects, and you can't focus on one course at a time. Fix: merge per course, not across courses.
Forgetting to back up the originals. Once you've split a chapter, deleted the original to save space, and then realized you need a different page range, you're stuck. Fix: always keep the original files until finals are over. Storage is cheap. Lost study materials at exam time are not.
Naming files generically. merged.pdf, final.pdf, Untitled.pdf, download.pdf — these are the files you can't find a week later. Fix: rename every file with course code, content type, and date. BIO201_AllLectures_2026Spring.pdf is searchable forever. merged.pdf is searchable until you make the next merged file.
Workflow Variations for Different Students
The workflow above is built around a specific student type (undergraduate, science course, exam-focused). Different student situations call for different adaptations.
Humanities students typically work with longer-form readings (book chapters, journal articles, primary sources) and write essays rather than take exams. The most useful operation here is usually PDF-to-Word conversion — being able to pull quotes, write inline notes, and build a research document with annotations from multiple sources is more valuable than merging or splitting. Skip the merge step; focus on building a personal annotated library.
STEM students with problem sets often need to combine worked solutions, lecture examples, and reference materials into a single working document. Merging is heavily used. Splitting is also useful for pulling out specific worked examples from longer documents. PDF-to-Word is less central since most problem-solving happens on paper or in software anyway.
Graduate students working on a thesis or dissertation often have hundreds of research papers to manage. The workflow is usually less about merging and more about organizing, annotating, and selectively converting papers that need detailed engagement. Reference managers like Zotero or Mendeley become essential alongside basic PDF tools — they handle the citation side that simple PDF tools don't.
Online learners dealing with downloaded course content from MOOCs or asynchronous programs face the same scattered-file problem as traditional students, often worse because course material accumulates faster than they can organize it. The Maya workflow above adapts directly — just substitute "module" for "week" and treat each course as a self-contained unit.
Tips That Actually Work
Set up the folder structure before you start downloading anything for a new course. Empty folders waiting to be filled prevent the Downloads-folder problem from ever happening. Rename every file as you save it, not "later." Later never comes, and lecture1.pdf becomes indistinguishable from every other lecture1.pdf from every other class. Do the merge/split/convert work in a single dedicated session before exam week starts, not in 30-second increments throughout the semester. Keep originals until the semester is over. Make your master study guide a Word document, not a PDF — you'll be editing it constantly, and PDFs aren't built for that. Search beats scrolling: a single merged PDF you can Ctrl+F through is more powerful than ten organized files you have to open individually.
Wrapping Up
Studying with PDFs isn't a file management problem — it's a focus problem. Every time you have to find a file, switch between documents, or scroll through 200 pages to find one section, you lose study momentum. The merge-split-convert workflow exists to remove those friction points so you can spend exam week actually learning the material instead of fighting your tools.
Maya's biology finals workflow takes about half a day to set up and saves dozens of hours during the actual study period. The same approach scales up or down depending on how organized you want to be — even just merging all your lecture slides and renaming the file properly is a meaningful improvement over the default scattered state.
The PDF tools used in this guide are available at https://pdfsdoctor.com/:
- Merge PDF — combine multiple lectures or documents into one file
- Split PDF — extract specific pages from large documents
- PDF to Word — convert PDFs to editable Word documents for annotation