Admission forms, scholarship portals, job applications and college submissions almost always ask you to upload something: a photograph, a signature, a mark sheet, a caste or income certificate, an ID proof. And almost every one of those upload boxes quietly asks the same question: PDF or JPG?
Pick the wrong one and the portal rejects the file, or worse, accepts a blurry scan that a verifying officer cannot read. This guide explains what actually separates the two formats, shows the results of a file-size and legibility test we ran on a specimen certificate, and gives you a simple rule for choosing.
The short answer
- Upload JPG for your photograph and signature, and for any field that asks for an image.
- Upload PDF for certificates, mark sheets, ID proofs and any document with more than one page.
- If the portal specifies a format or size limit, follow it exactly. The portal's instructions always beat general advice, including this article.
The rest of this guide explains why, so you can handle the fields that are not so clear.
What JPG and PDF actually are
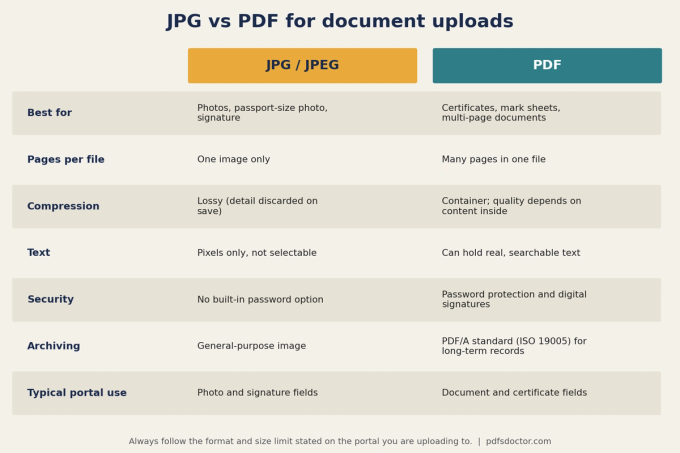
JPG (or JPEG) is an image format defined by the Joint Photographic Experts Group and standardised as ISO/IEC 10918-1. It was designed for photographs. It uses lossy compression: when you save a JPG, the encoder throws away fine detail that the eye is unlikely to notice, which is why photos stay small. One JPG file holds one image.
PDF (Portable Document Format) was introduced by Adobe in 1993 and became an open international standard, ISO 32000, in 2008. A PDF is best thought of as a container for pages. Those pages can hold real text, vector graphics, images, or all three, and one file can hold many pages. PDF also supports password protection and digital signatures, and it has an archival version, PDF/A (ISO 19005), built for records that must stay readable for years.
That difference, one image versus a container of pages, explains almost every practical difference below.
Why portals ask for JPG for photos and signatures
A passport-size photograph or a signature is a single small image. It gets displayed on an admit card, an ID or a form preview, often at a fixed pixel size. JPG is ideal for this: it is supported by every device and system, it keeps photos small, and a portal can check and resize it easily. That is why photo and signature fields so often ask for JPG within a specific size range in KB, and sometimes specific pixel dimensions.
Why PDF is better for certificates and mark sheets
It keeps multi-page documents together. A degree certificate might have a back side; a transcript might run three pages. As a PDF, that is one file in the correct order. As JPGs, it is three separate files that can be uploaded out of order, or not at all if the field only accepts one file.
It can carry real text. A PDF you download from your board, university or a service such as DigiLocker usually contains actual text rather than a picture of text. That makes it sharp at any zoom level and tiny in size (see our test below).
It looks the same everywhere. Page size and layout are fixed, so the person verifying your document sees what you saw.
It is the expected format for records. Many institutions ask for documents as PDF because it is the standard format for storing and archiving records.
Our test: what really happens to file size and clarity
To give you numbers instead of guesses, we ran a controlled test at PDFs Doctor in September 2026.
Method. We created a three-page A4 specimen certificate and mark sheet (not a real document) containing a heading, body text, a table of marks, a seal, a signature line and a line of 7-point fine print. We rendered it at 300, 200 and 150 DPI and added a light paper tint and mild noise to imitate a real colour scan. We then saved the images as JPG at different quality settings using the Pillow imaging library, wrapped the JPGs into PDFs without re-compressing them, and compared file sizes. We also checked whether the fine print stayed readable.
Your own scans will produce different numbers depending on your scanner or phone, the paper and the lighting, but the patterns below hold in general.
Finding 1: JPG quality changes file size dramatically
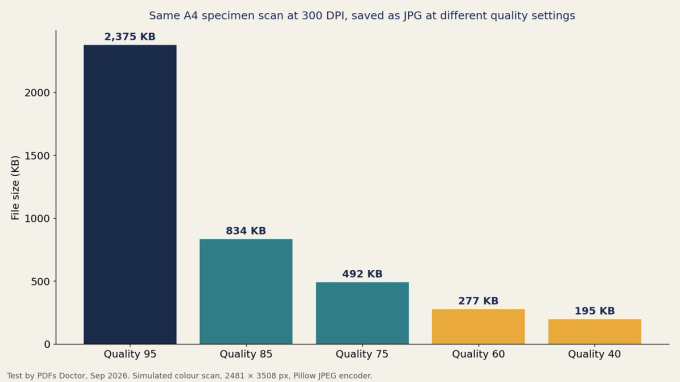
The same page went from 2,375 KB at quality 95 to 492 KB at quality 75, roughly a fifth of the size. If a portal gives you a 500 KB or 1 MB limit, the quality setting alone can be the difference between rejection and acceptance.
Finding 2: Lower quality did not make the text unreadable
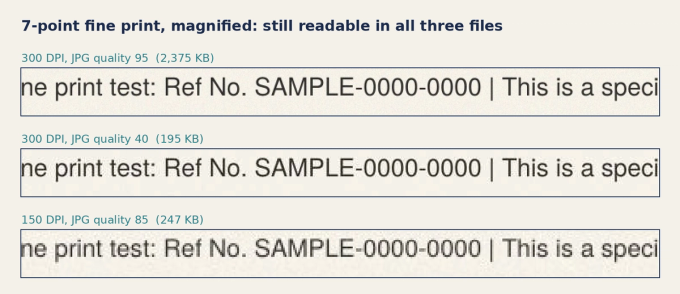
This surprised us. Even at quality 40 (195 KB), the 7-point fine print was still readable when magnified, and so was the 150 DPI version. You see some softness and faint artefacts around letters, but the text remains clear. The lesson: you rarely need maximum quality for a text document. Starting around quality 75 to 85 is a sensible balance, and you should always zoom in on your final file to confirm.
Finding 3: Resolution matters as much as quality
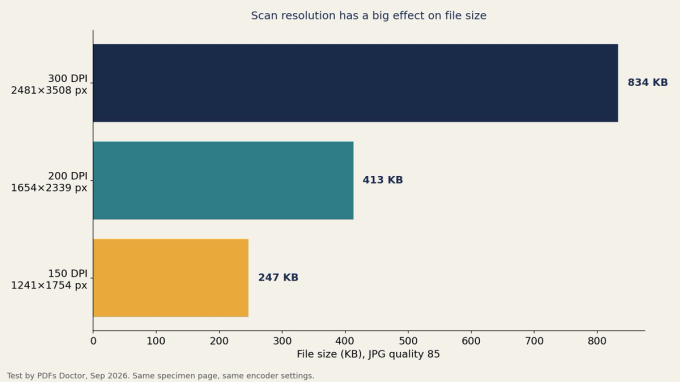
Dropping from 300 DPI to 200 DPI roughly halved the file (834 KB to 413 KB). For standard printed certificates, 200 to 300 DPI is a common range. If your file is too large, reducing resolution is often a cleaner fix than crushing JPG quality.
Finding 4: Putting a JPG inside a PDF barely changes its size
Wrapping the 834 KB JPG into a PDF added only about 1.4 KB. Three JPG pages totalling 1,201 KB became a single three-page PDF of 1,204 KB. Converting a scan to PDF does not make it heavier in any meaningful way; it just packages it properly. (Some converters do re-compress images, so results vary by tool.)
Finding 5: A digital PDF beats any scan
The original digital version of our three-page specimen, with real text instead of scanned pixels, was under 5 KB. The scanned three-page PDF was about 1.2 MB, over 200 times larger. If your institution provides an official digital copy of a document, uploading that is usually both smaller and sharper than scanning a printout.
Finding 6: A scanned PDF is still just a picture
We ran a text-extraction check on both PDFs. The digital PDF returned all of its text. The PDF made from scans returned none, because it contains only images. A "PDF" is not automatically searchable; that requires either a digital original or OCR (optical character recognition).
Two more details from the test
- Re-saving a JPG loses a little quality each time. We re-saved the same image ten times at quality 75 and measured the change against the original using PSNR (a standard image-fidelity score where higher is better). It fell from 34.84 dB after the first save to 34.46 dB after the tenth. The loss is small at a fixed setting, but it adds up if you repeatedly edit, crop and re-save. Keep your original scan and export from that.
- Greyscale saved less than expected. Converting our colour scan to greyscales reduced the JPG by only about 8%, because JPG already stores colour information at reduced detail. Greyscale can also make coloured stamps and seals harder to see, so only use it if the portal allows it.
A quick decision guide
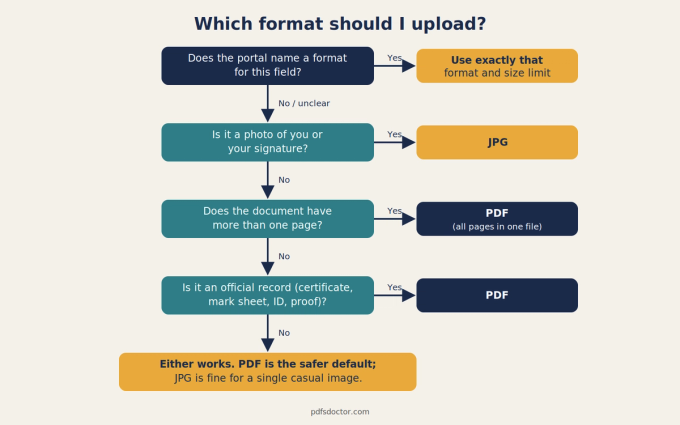
Format by document type
Passport-size photograph: JPG. Your photograph is a single image that the portal prints on admit cards and ID cards at a fixed size, so it belongs in JPG. Most portals set a size range in KB and sometimes exact pixel dimensions for this field, so crop and resize the photo to match before you upload.
Signature: JPG. A signature is also a single small image. Sign in dark ink on plain white paper, scan or photograph it, and crop closely around the signature so the portal's resizing does not shrink it into an unreadable line.
Single-page certificate: PDF. Even with only one page, a certificate is an official record. PDF keeps its layout fixed and shows it exactly as issued, and it is the format institutions expect for documents. If you have an official digital copy, upload that instead of scanning a printout.
Mark sheet or transcript: PDF. Mark sheets and transcripts often run to more than one page or have details printed on the back. Put every page into one PDF, in the correct order and upright, so nothing is missed during verification.
ID proof with a front and back: PDF. Aadhaar cards, driving licences and similar IDs usually carry information on both sides. Combine both sides into one PDF, either as two pages or placed together on a single page, so the verifier sees the complete proof in one file.
Fee receipt or screenshot: follow the portal. A receipt is usually a single image, so either format can work. Use whatever the upload field asks for; if it accepts both, PDF is the safer choice, because it keeps a multi-page receipt together if a second page ever turns up.
How to prepare a document for upload
- Read the field instructions first. Note the format, maximum and minimum size, and any pixel dimensions.
- Scan or photograph carefully. Place the document flat on a plain, contrasting surface in good, even light. Avoid shadows, glare and tilted angles. A flatbed scanner or a phone scanning app that crops and straightens pages gives the cleanest result.
- Choose a sensible resolution. 200 to 300 DPI is suitable for most printed documents.
- Combine pages into one PDF when the document has more than one page, in the correct order and orientation.
- Get under the size limit the smart way. Lower resolution first, then JPG quality, or compress the finished PDF. Avoid scaling the image so small that stamps and numbers blur.
- Zoom in and check. Every name, number, date, seal and signature should be readable.
- Name the file clearly, for example Name_Class12_Marksheet.pdf, and keep a copy of exactly what you uploaded.
If you need to convert JPG to PDF, merge pages or reduce a file's size, you can do it with the free tools on PDFs Doctor.
Free download: Document Upload Checklist (PDF, 1 page) — print it or keep it on your phone for your next application.
Common mistakes to avoid
- Renaming a file instead of converting it. Changing photo.jpg to photo.pdf does not turn it into a PDF. The file is still a JPG inside, and many portals will reject it or fail to open it. Use a proper converter.
- Uploading one page of a multi-page document. Check that the back side or the remaining pages are included.
- Using screenshots of documents. Screenshots often include phone status bars and are cropped at low resolution. Use the original digital file or a proper scan.
- Over-compressing. A file that fits the size limit but cannot be read may lead to your application being flagged or rejected. Legibility comes first.
- Forgetting about hidden information. Photos taken on a phone can contain EXIF metadata, which may include the date, device model and, if location was on, GPS coordinates. For personal documents, scanning apps and conversion to PDF are good habits, and turning off camera location is worth considering.
Security and privacy
Certificates and ID proofs contain personal information, so upload them only to official portals, reached by typing the address yourself or following links from the official website. Check that the address is correct and uses HTTPS. When you use an online tool to convert or compress a document, choose one that states clearly how long it keeps files and whether it deletes them after processing.
Frequently asked questions
Is PDF better quality than JPG? Not automatically. A PDF made from a scanned JPG has exactly the quality of that JPG inside it. A PDF is better when it contains real text from a digital original, or when you need several pages in one file.
Can I upload a JPG if the portal asks for a PDF? No. Convert the JPG to PDF with a proper converter first. Renaming the file extension does not work.
Why does my certificate get rejected for size? The file is larger than the portal's limit. Reduce the scan resolution, lower the JPG quality a little, or compress the PDF, then check the text is still readable.
What DPI should I scan certificates at? 200 to 300 DPI suits most printed certificates. Use 300 DPI if the document has very small text or fine detail.
Is JPEG different from JPG? No. They are the same format. The three-letter .jpg extension comes from older systems that limited extensions to three characters.
Should I scan in colour or black and white? Use colour if the document has coloured stamps, seals, signatures or security features, unless the portal asks otherwise. In our test, greyscale saved only about 8% in file size.
Conclusion
Use JPG for images of you, your photograph and signature, and PDF for documents about you: certificates, mark sheets and ID proofs. Keep multi-page documents in a single PDF, prefer official digital copies over scans when you have them, and control file size by adjusting resolution and quality rather than sacrificing legibility. Above all, read each upload field's instructions and follow them exactly.